Tuesday, November 6, 2007
Finished Animation
Monday, November 5, 2007
Project Conclusion
Well, rendered the first two shots and assembled the video (with a playblast placeholder for the last shot) with the sound.
I will get the last shot from Andrew Tuesday morning and swap it for the placeholder and render our complete animation ready to hand in for class.
I have worked so much on these 15 seconds that I think I have lost all objectivity, but I am happy with it. There are things I would go back and change if I could of course, but that's part of the learning process. It will be very interesting to go back and watch this animation again in a couple of months and see what I think of it.
# posted by Andre : Monday, November 05, 2007

Sunday, November 4, 2007
Will the tweaking never end?...and...Sound, it's Important!
I continued working with the animation. Trying to get a more fluid feel to Phil's movement. It's really difficult in such a short amount of time. I think less is more here. Simple movements. So I added just a bit of a head turn to shot 2. I also played with a bit more vocalization. Just grunting. I don't want him to talk. I think it adds another dimension to the animation.
I just read this article by Michael Geisler about sound effects for animation. He has done sound for motion pictures as well as animation. The thing that resonated with me is where he notes that the sound effects must be cut very precisely with the animation (seems obvious) but that the timing isn't necessarily where you think it is (not so obvious), and that the sound itself is not necessarily what you think it is either. I found this true with the glass shattering sound when Phil "Gets It". First what was interesting is that I had to use more than one type of glass shattering sound to get "realism". I had to use the sound of a lightbulb popping and a water glass breaking. Then I had to play with the timing of the sounds relative to each other. What really struck me was that if I placed the sound to happen at exactly the end of the last frame, it didn't feel right. It didn't seem to match the visual. I played around with the timing and found I had to time the sound a bit "late." Maybe this is due to the natural effect of sound waves traveling slower than light? I don't know for sure (need to investigate further). But it really makes a difference.
[Animation World Magazine Article Issue 4.1 April 1999 - http://www.awn.com/mag/issue4.01/4.01pages/geislersound.php3]
It's funny. It just now occurred to me that perhaps there is a place for me in the world of animation doing sound production! I left that part for last on this project, which was a mistake, but I was so worried about the animation part of it. Now I realize that it is integral. Of, course we created sound that was pretty close for the 2D animatic, and that did help a lot. But I realized how important the nuance of the sound design is to the final piece.
# posted by Andre : Sunday, November 04, 2007
Friday, November 2, 2007
Tweaking the Animation
Worked on the animation in Shot 1. Phil's reaction to the fly is not right. It is too slow and systematic. He looks like a robot. I have animated a bit more of a double take now, as he looks for the where the sound is coming from. A quick look to the left and then the right. It's amazing how as the timing gets closer you can feel that it is more "right". The more acting I did, the easier it got too.
Here are before and after playblasts to compare:
Here are before and after playblasts to compare:
# posted by Andre : Friday, November 02, 2007
Tuesday, October 30, 2007
Adding sound
I got the other two shots from Andrew, and just put them end to end, and added the titles are at both ends. Then I added sound to the animation.
The more I made the sound a bit silly, the better it seems to work.
The sound really helps tie it all together. I recorded some of my own breathing and grunting to add in. Sounds a bit silly but adds to the "drama" and helps build up to the pop.
Then I rendered the whole animation as a PAL MPG file as it seems to look best that way. There seems to be an issue with the shadows on the floor. I like how dim the animation is, but the shadows seem to flicker because of it. When the scene is lit brightly (when Phil is about to pop) the flickering goes away. I suppose we can fix that by upping the shadow quality, but it will push the render times even more. We had an average of 3:09 render time per frame (Targa files at 720x576) which totalled 19.2 hours of render time. This makes it crystal clear why render farms exist!!
# posted by Andre : Tuesday, October 30, 2007
Monday, October 29, 2007
Hollywood Camera DVD
I watched some excerpts of the DVD on the website. The chapter on Pushes is really fascinating. It is amazing to see how powerful the camera work is in a scene.
It also shows how useful previz is.
http://www.hollywoodcamerawork.us/mc_sampleclips.html
[screenshot from the website]
I must dig into these over the break. It's really amazing to me how many skills are involved in creating even a simple animation (15 seconds even!) I can see why so many people are employed in large animation jobs. There are so many specialties. On the Pirates of the Caribbean 2: Dead Man's Chest ILM website (http://www.ilm.com/theshow/) it says there were 96 Technical Directors. Tells you how big a job it was.
It also shows how useful previz is.
http://www.hollywoodcamerawork.us/mc_sampleclips.html

[screenshot from the website]
I must dig into these over the break. It's really amazing to me how many skills are involved in creating even a simple animation (15 seconds even!) I can see why so many people are employed in large animation jobs. There are so many specialties. On the Pirates of the Caribbean 2: Dead Man's Chest ILM website (http://www.ilm.com/theshow/) it says there were 96 Technical Directors. Tells you how big a job it was.
# posted by Andre : Monday, October 29, 2007
Sunday, October 28, 2007
Render of Shot 2
Installment 5:
This is a small version of the render of Shot 2 with all the bells and whistles so far. It's a short one only 58 frames (a little under 2.5 seconds).
It's starting to come together. The look is not bad and the animation is getting there (The original looks much nicer-the compression on this blog is not the best). It's a bit hard to do much with Phil in this shot as it's so quick, but I think he could follow the fly a bit more, rather than ignore it so much. It's a fine line though, as he's supposed to be trying to ignore it.
# posted by Andre : Sunday, October 28, 2007
Finishing up the Animation for real - continued 3

Finishing up the Animation for real - continued 2
Installment 3:
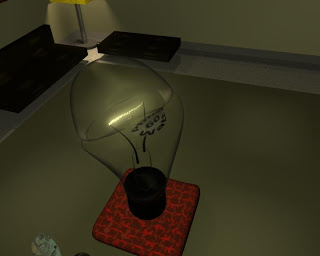
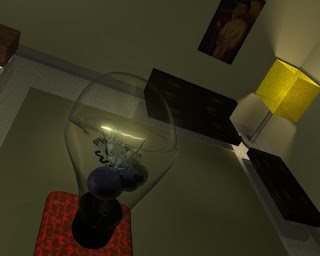
So I had to work with the driven keys a lot to animate the glow effects on Phil. There are three glow effects. One for the mouth shader (the filament), one for his body, and one is an actual point light parented to his head that resides in the center of the filament, that way I could get the glow effect and actually light up the room. I was trying to control it all by driving them with the Translate Z of the ROOT, but that was not working because I wanted the glow to change when he was working himself up, not just when he was floating. So I created a funky unidirectional nurbs curve and set the Translate Y to control the mouth glow, Translate X to control the light intensity, and the Rotate Y to control the bulb glow. That way I could control 3 things with the one curve. It actually works quite well.
Here are some shots that show the different levels of glow:

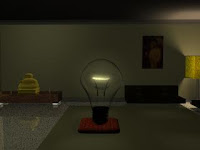
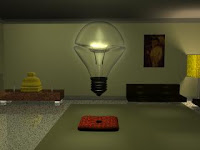

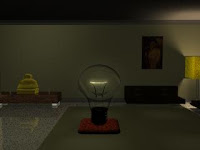
I think it works quite well. Although I do think I need more time to tweak the effects and I would like to try a flare effect, but the render times are already pretty substantial, but I guess that's just part of it.
So I had to work with the driven keys a lot to animate the glow effects on Phil. There are three glow effects. One for the mouth shader (the filament), one for his body, and one is an actual point light parented to his head that resides in the center of the filament, that way I could get the glow effect and actually light up the room. I was trying to control it all by driving them with the Translate Z of the ROOT, but that was not working because I wanted the glow to change when he was working himself up, not just when he was floating. So I created a funky unidirectional nurbs curve and set the Translate Y to control the mouth glow, Translate X to control the light intensity, and the Rotate Y to control the bulb glow. That way I could control 3 things with the one curve. It actually works quite well.
Here are some shots that show the different levels of glow:


I think it works quite well. Although I do think I need more time to tweak the effects and I would like to try a flare effect, but the render times are already pretty substantial, but I guess that's just part of it.
# posted by Andre : Sunday, October 28, 2007
Finishing up the Animation for real - continued
Installment 2:
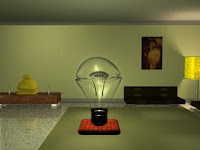
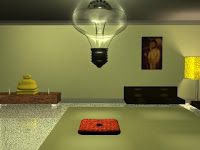
So the lighting turned out to be quite a bit trickier than I had expected. Will's advice has been invaluable as has the Mastering Maya 8.5 book. Philip gave us a nice insight last Tuesday telling us we should move the poster from the center of the wall. It does help a lot to keep your attention focused on the bulb. You don't get distracted by the poster that shows through his transparent body. I got the lighting down to a point light in the lamp (with Will's advice) and another point light in the ceiling that I used to lighten up the scene. I turned off the shadows on that light to make things simpler. Getting the lamp to look right was a lot of work. I'm still not sure about it, but it will have to do. I feel like I'm doing triage sometimes, "fix that guy up and send him back to the front!"
Will helped us with the smoothing of the bulb, which now looks quite good I think. Here is a render:
This is the first frame of shot 2
So you may be wondering what that is peaking up from the bottom of the frame. Well we were having a hard time making the fly POV camera work. So Will to the rescue...he suggested we just put a fly in the shot, parent it to the camera and animate it's wings and voila. I added a bit of texturing to the body and made the wings translucent and shimmery looking (very quickly, "back to the front with him!"). Here is a shot with the fly fully in frame:
The little guy looks pretty neat flying around Phil's bulb. The translucent wings make a nice difference (another Will suggestion).
So the lighting turned out to be quite a bit trickier than I had expected. Will's advice has been invaluable as has the Mastering Maya 8.5 book. Philip gave us a nice insight last Tuesday telling us we should move the poster from the center of the wall. It does help a lot to keep your attention focused on the bulb. You don't get distracted by the poster that shows through his transparent body. I got the lighting down to a point light in the lamp (with Will's advice) and another point light in the ceiling that I used to lighten up the scene. I turned off the shadows on that light to make things simpler. Getting the lamp to look right was a lot of work. I'm still not sure about it, but it will have to do. I feel like I'm doing triage sometimes, "fix that guy up and send him back to the front!"
Will helped us with the smoothing of the bulb, which now looks quite good I think. Here is a render:

This is the first frame of shot 2
So you may be wondering what that is peaking up from the bottom of the frame. Well we were having a hard time making the fly POV camera work. So Will to the rescue...he suggested we just put a fly in the shot, parent it to the camera and animate it's wings and voila. I added a bit of texturing to the body and made the wings translucent and shimmery looking (very quickly, "back to the front with him!"). Here is a shot with the fly fully in frame:

The little guy looks pretty neat flying around Phil's bulb. The translucent wings make a nice difference (another Will suggestion).
# posted by Andre : Sunday, October 28, 2007
Finishing up the Animation for real
I've been too busy to post the last two weeks, as all the assessments are coming up. I've probably bitten off more than I can chew, but we'll see. Anyway I'll catch up on the work I've done now.
Installment 1:
So this whole animation thing is quite difficult. It's really easy to get confused about what you're trying to do and where the character is going. Makes a whole lot of sense now why you make the 2d animatic. I must have watched that thing a hundred times by now. Every time I lose track of the timing I just fire it up and it reminds me visually of what I'm trying to accomplish. Not that it does it for you. I'm trying hard to avoid Graph Editor Spaghetti, but it's hard. I can't imagine what it would be like with a multitude of characters.
Here are some playblasts I did as I was going along to check on my own progress.
Playblast of the first shot:
Plablast of the second shot:
Playblast of the third shot:
# posted by Andre : Sunday, October 28, 2007
Wednesday, October 17, 2007
Animation Examples, Poorhouse FX, The Embassy VFX, ILM
Here are some links to useful sites:
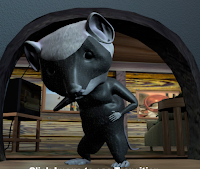
This one is nice in that you can see what one person can accomplish...2 Blind Mice
http://www.poorhousefx.com/2_Blind_Mice/Home.htm
Not the greatest animation (pretty bad sound, but modeling is decent)

This one is a good tutorial by Larry Neuberger maker of the above film on creating blend shapes:
http://www.highend3d.com/maya/tutorials/animating/Animating-Facial-Expressions-using-Blend-Shape-249.html
Not a tutorial I needed really, but I thought it might come in handy to make Phil look like he was actually on the cushion. Turned out it wasn't what I thought, but there is a lot of good information here on driven keys.
http://www.highend3d.com/maya/tutorials/animating/82.html
Came across the website for Embassy Visual FX (http://www.theembassyvfx.com/). They have made many stunning visuals for a lot of commercials I have seen. Impressive and inspiring work. I particularly like the Citroen ads.
This website has a great article on how this car/man was created and lit, as well as nice pics.
http://www.cgwhat.com/index.php?option=com_content&task=view&id=3&Itemid=1
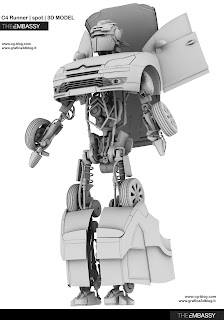
[Pic from http://www.videogiochi3d.it/img-esterne/citroen-c4/01-modello.jpg]
Came across the ILM site for Pirates: Dead Man's Chest. There is a great section detailing the flow of how the shots were created from shooting live action and acquiring MoCap Data to compositing, Lighting, etc. This is a wonderful overview of the process and an insight into the many roles in a project like this, not to mention the magnitude of it.
http://www.ilm.com/theshow/


[snapshot from the site]
This one is nice in that you can see what one person can accomplish...2 Blind Mice
http://www.poorhousefx.com/2_Blind_Mice/Home.htm
Not the greatest animation (pretty bad sound, but modeling is decent)


This one is a good tutorial by Larry Neuberger maker of the above film on creating blend shapes:
http://www.highend3d.com/maya/tutorials/animating/Animating-Facial-Expressions-using-Blend-Shape-249.html
Not a tutorial I needed really, but I thought it might come in handy to make Phil look like he was actually on the cushion. Turned out it wasn't what I thought, but there is a lot of good information here on driven keys.
http://www.highend3d.com/maya/tutorials/animating/82.html
Came across the website for Embassy Visual FX (http://www.theembassyvfx.com/). They have made many stunning visuals for a lot of commercials I have seen. Impressive and inspiring work. I particularly like the Citroen ads.
This website has a great article on how this car/man was created and lit, as well as nice pics.
http://www.cgwhat.com/index.php?option=com_content&task=view&id=3&Itemid=1

[Pic from http://www.videogiochi3d.it/img-esterne/citroen-c4/01-modello.jpg]
Came across the ILM site for Pirates: Dead Man's Chest. There is a great section detailing the flow of how the shots were created from shooting live action and acquiring MoCap Data to compositing, Lighting, etc. This is a wonderful overview of the process and an insight into the many roles in a project like this, not to mention the magnitude of it.
http://www.ilm.com/theshow/

[snapshot from the site]
# posted by Andre : Wednesday, October 17, 2007
Monday, October 15, 2007
More renders, now with Environment!
Andrew sent me the Environment files so I was able to put those into the master scene and get some renders happening.
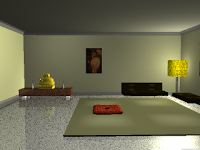
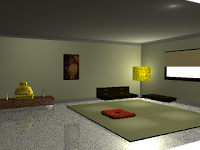
Front view of the environment
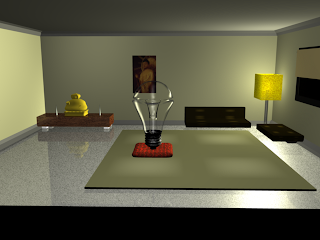
3/4 view of the environment
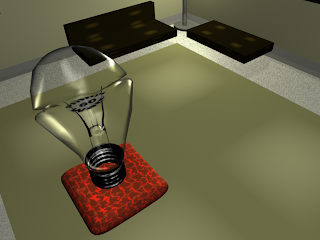
Phil in the environment
It's interesting that the render window does not display the images at full quality somehow. In the render window you can see color banding that is not in the outputted (?) image. Must keep this in mind as we go further and not get too worried about that without checking the renders outside the render window.
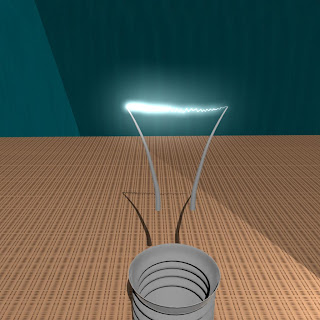
Frame from Fly POV Camera
# posted by Andre : Monday, October 15, 2007
Saturday, October 13, 2007
First bit of animation with Phil
Had a really productive morning today:
I finally worked out how to stencil his "eye" on. I selected some faces on the front of him and gave them a different material. Then I Planar Mapped the stencil file onto the front of him. I had a dream last night that that would work. I don't know where that came from, but I'm glad it did.
Then I realized that lattice deformers had controls so I was able to undo his deformation and redo the above on his smooth surface with a spherical mapping. Then redo the deformation with the attribute and voila, his eye was on his deformed body.
Then I realized I could use the lattice deformer version and create geometry of different shapes - by duplicating and deforming and then duplicating again and so on - and use those to create blend shapes. So I got the blend shapes to work and just to give it a go created a 1 second animation of moving his eyebrow up and down.
# posted by Andre : Saturday, October 13, 2007
Tuesday, October 9, 2007
Phil project update
Tried to get the file organization going. Created the master project...but I'm not sure if each shot should have one or should I create 3 cameras for the 3 shots within the one master. Need to ask Will tonight.
Created the assets folder and started putting the files in and updating the log.
File referencing seems to work fairly simply, there shouldn't be any real issues there.
Worked on Phil:
Created an eye with a sphere, but when it's transparent you can't really tell it's there. Maybe with the text UV'ed on it it would work. Need to try that.
Then I created a lattice deformer for Phil and that seems to be a viable option to create an eye with a brow. That will give us more control on the expressiveness. However, I tried duplicating him and creating blend shapes and I got an error saying no objects found. Tried it again with just the bulb part and still no luck. More questions for Will. I hope he's ready ;-)
# posted by Andre : Tuesday, October 09, 2007
Sunday, October 7, 2007
Axe Swing Take 2
Worked on the axe swing some more. Man I am starting to get really frustrated. I can't seem to figure out a way to consistently get the keys to record the movements. I'll spend all this time tweaking a position and key it. Then I'll play it back and some element (the axe, or the wrists) won't move. I tried using the S command to key all the attributes. I tried using the Shift-W and Shift-E commands to key only moves and rotations and it just doesn't seem to work. I must be parenting the axe to the controllers incorrectly. I'll try again later...I have spent hours on this and I have like 15 versions and none of them work properly!
# posted by Andre : Sunday, October 07, 2007
Saturday, October 6, 2007
Meeting with Andrew
Met up with Andrew and we discussed some things that we should have settled already (oh, well better late than never, and not his fault certainly).
We have divided the modeling as follows:
Phil - me
Environmental stuff - Andrew: this includes the room (and window), a lamp, a buddha (low res as it is far in the background and small), a candle, a small table, a cushion and a poster with frame.
There should only be one light rig as there is only one environment.
I'll keep track of the Master project and the Assets folder: I need to get this organized...:-(
Rigging the character. So far the rig appears to be very straight forward as Phil won't have much range of motion. I think FK and just a couple of joints should do. The blend shapes will be more important I think. Actually I'm really not sure how to go about this...more questions for Will.
The soundtrack I can take care of. The 2D animatic sound track is close, just need to tighten it up a bit (especially the fly sound stuff).
There are 3 shots: the intro, the fly POV shot, and the shot where Phil gets it. We haven't decided how to divide these up yet. We need rigged models and camera moves first. Should these be separate master files? More questions...
# posted by Andre : Saturday, October 06, 2007
The Axe Swing - Take 1
So I tried my hand at the axe swing using Will's character (by the way, I'd like more info on how to create those cool controls...). This is by no means an easy feat. I did it 4 times, and it still seems to suck. Well, I guess I just need more practice. Here is a Quicktime of the render:
It has a bit of snap, but the weight doesn't feel right...
It has a bit of snap, but the weight doesn't feel right...
# posted by Andre : Saturday, October 06, 2007
Thursday, October 4, 2007
More work on Phil
Stopped slacking this week and got around to working on Phil some more. Got the transparency and refraction issues pretty well sorted out. Added in a mouth and got it work like a filament by playing with the incandescence values. I had been using ramps with the transparency but it seems to block the incandescence of the filament, so I inverted the ramp and it seems to work okay. I'll have to ask Will about this. Here are some renders:
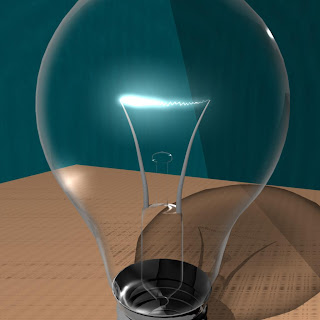
First I rendered without the bulb to see if the incandescence was working. Not bad (a bit bright, but...). Then I added the bulb with the fixed transparency ramp (learned that trick from a tutorial on the spafi.org site). These were done using the mentalray shader. I hope that's okay. I'll have to ask Will about that too.
So then I started thinking about the eye. I tried to add "Philips 60Watt" as a UV on the bulb, but it doesn't show up when I render (maybe because it's transparent). One of the forums mentions layered textures, I'll have to look into that and ask Will if that's the way to go. I hope we're not shooting ourselves in the foot with the transparency!?
# posted by Andre : Thursday, October 04, 2007
Sunday, September 30, 2007
Modeling Phil
Started modeling Phil. I started with a straight bulb first. I'll work out some of the texture issues then I'll "push" his shape more.
Here are is first render:
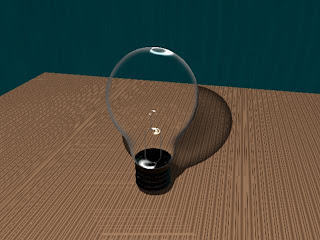
You can see that the refraction is way too high, the bulb is blocking it's own shadow!
I'll have to fix that and then work on adding in the filament (what will be his mouth).
Here are is first render:

You can see that the refraction is way too high, the bulb is blocking it's own shadow!
I'll have to fix that and then work on adding in the filament (what will be his mouth).
# posted by Andre : Sunday, September 30, 2007
Sunday, September 23, 2007
References
I did a bit of research this week, and found the sites that everyone seems to know about already. Well, better late than never.
Here are some of the sites I have been using for reference:
http://highend3d.com/ - this site has a lot of great tutorials and some things you can download, like shaders that make it a bit easier to get started.
http://www.spafi.org/index.php - this site has some good tutorials as well. There was a good one about creating a glass shader that should be really helpful for Phil.
I also got around to reading some of Keith Lango's blog/site. Awesome animation tutorials on here.
I paid particular attention to how he has updated the tutorials over the years. That's a hard thing fro me to remember. We are always growing and learning. Even the guys who seem to have it figured out, are learning. That's what keeps them working and great I guess. The reversal of position on adjusting the keyframe pose timings in the dope sheet, to his current view of creating more keyframes is a good example. This actually fits my intuition as well. Get it as close as you can at first, then tweak. It's a hard impulse to resist: I'll just fix it later...well maybe, but it's probably going to be a lot harder. I've learned this in recording music over the years. Better to do another take than try to fix it in the editing!
# posted by Andre : Sunday, September 23, 2007
Sunday, September 16, 2007
2D Animatic
Worked on the 2D Animatic today. I imported all the screenboard drawings that Andrew made into Sony Vegas Video. I also did some photoshop editing to remove Phil from the background to make it easier to "animate" a couple of the shots. Here is the final draft. I had to rearrange the story a little bit as it wasn't possible to get the timing to flow smoothly with only 15 seconds using the original idea. I made Phil ignore the fly instead of reacting strongly. I think it makes for a better ending and it shaves some time off Phil settling himself for the ending.
I think this is pretty close to what the final timings should be. It's a little difficult to know for sure of course without a 3D Animatic, but that comes next. This was a very interesting process, as it made it very, very clear whether or not the timings were going to work. It also made it obvious that the sound was going to be very important, especially as there is no dialog. The sound in the animatic is not the final sound. It's just a trial run to feel out what kind of sounds might work, and what is needed to add believability to the scene. When we create the final animation we will need to redo the final sound design.
I think this is pretty close to what the final timings should be. It's a little difficult to know for sure of course without a 3D Animatic, but that comes next. This was a very interesting process, as it made it very, very clear whether or not the timings were going to work. It also made it obvious that the sound was going to be very important, especially as there is no dialog. The sound in the animatic is not the final sound. It's just a trial run to feel out what kind of sounds might work, and what is needed to add believability to the scene. When we create the final animation we will need to redo the final sound design.
# posted by Andre : Sunday, September 16, 2007
Saturday, September 15, 2007
Rigging, the reprise
Worked on rigging the BoxCar character Will made for us today. That was quite interesting. It's fairly easy and straight forward to create the joints and bind them to the skin. Although I did have some weird behaviour with the Eyes. I don't think I bound them to the right thing. When I moved the head the eyes moves into or out of the head. I'll have to keep working with that.
Painting weights on the skin is quite time-consuming however. It's a bit of a pain to get the joint to only affect the parts you want especially feet that are close together and so on. Sometimes the hip joint moving will make the feet CV's move, but it's not the hip joint doing it, but the knee say, which is being moved by the hip and then moving the foot which has some weight assigned to the other foot. Bit fiddly to get it to let go, but it can be done with some time and attention. I got BoxCar to move fairly well, except his eyes. Must sort that out.
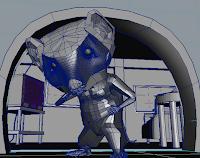
The Maya Mastering book is really a helpful resource. It's chock full of tutorials. Makes life a lot easier. Here is a render of BoxCar in a pose after rigging.
Worked out the issue with the eyes. The eyes group was grouped to the wrong thing. That's a relief. Here goes the render.

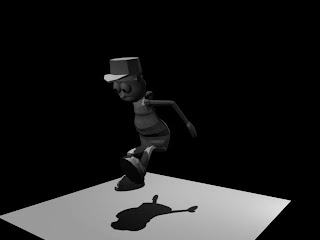
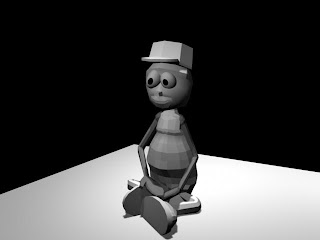 The poses aren't quite right, but it shows that the rigging works fairly well. More painting needed in the chest and belly area on the sitting pose and second jumping pose. But not bad for a start.
Painting weights on the skin is quite time-consuming however. It's a bit of a pain to get the joint to only affect the parts you want especially feet that are close together and so on. Sometimes the hip joint moving will make the feet CV's move, but it's not the hip joint doing it, but the knee say, which is being moved by the hip and then moving the foot which has some weight assigned to the other foot. Bit fiddly to get it to let go, but it can be done with some time and attention. I got BoxCar to move fairly well, except his eyes. Must sort that out.
The Maya Mastering book is really a helpful resource. It's chock full of tutorials. Makes life a lot easier. Here is a render of BoxCar in a pose after rigging.
Worked out the issue with the eyes. The eyes group was grouped to the wrong thing. That's a relief. Here goes the render.


 The poses aren't quite right, but it shows that the rigging works fairly well. More painting needed in the chest and belly area on the sitting pose and second jumping pose. But not bad for a start.
# posted by Andre : Saturday, September 15, 2007
Thursday, September 13, 2007
Kung Fu Hustle
Kung Fu Hustle is a great martial arts film that uses lots of animation and compositing. So many of the scenes use 3D. The head of the animation firm that did the special fx said there were aproximately 100,000 man hours involved. Meaning that if only one person had to do it all it would take them about 35 years, working 55 hours a week. But the result is spectacular. Here a few shots from a wonderful scene where assassins use a musical instrument to conjure skeleton warriors:
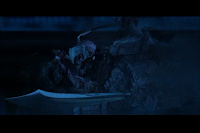
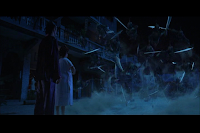
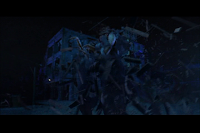
[screenshots from Kung Fu Hustle by Stephen Chow]


[screenshots from Kung Fu Hustle by Stephen Chow]
# posted by Andre : Thursday, September 13, 2007
Tuesday, September 11, 2007
The Art of Rigging
A whirlwind tour tonight on the art of rigging. We quickly (and I mean quickly) covered rigging with joints and bones, using Forward and Inverse Kinematics. We also looked at animating the camera using paths and editing those paths to play with its movement. This will be very useful stuff in our animation, as we have a sequence where we will animate the camera from the point of view of a fly buzzing around Phil's "head".
Our 2D animatic is due next week, so lots more drawing ahead, as well as scanning them in and using Sony Vegas to nail down the timings and give them some "animation" quality.
Our 2D animatic is due next week, so lots more drawing ahead, as well as scanning them in and using Sony Vegas to nail down the timings and give them some "animation" quality.
# posted by Andre : Tuesday, September 11, 2007
Monday, September 10, 2007
Thoughts about creating Phil
Using lattice deformers should make it fairly simple to create Phil's bulb using a simple sphere. The tricky part is going to be his glowing filament and the glow overall, not to mention his glass bulb. There are a few tutorials around though for creating glass in Maya online, and in the Mastering Maya 8.5 which was a good buy for sure.
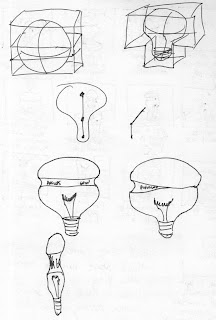
[thoughts on using lattice deformers]

[thoughts on using lattice deformers]
# posted by Andre : Monday, September 10, 2007
Saturday, September 8, 2007
Working on the Character Dossier
Notes for the Character Dossier:
We settled on Phil Bulbman (as in Philips bulbs, ha!)
He's a 60W (not real bright) light bulb (still debating whether or not he's clear or soft-white).
Occupation: Lighting
Eyes: Black text - "Philips" and "60W"
Marital Status: Single
Lives: New York City Apartment, 3rd floor, 2BR
Height: 100cm (big bulb!)
Base: Shiny metal (alum)
Age: 35
Personality: Impatient
He's jealous of CCFL (high-efficiency) light bulbs, so he is trying to better himself through meditation. After 15 years in NYC he is losing his brightness and is trying to regain it. He's feeling a little "burned-out" from working so hard to a make a living in NYC. He moved to NYC to find a better life and experience the big city. He was born and raised in Alburnett, IA (pop. 559). Sick of living in a small town with nothing to do so he moved to NYC to experience more things. Trying to make himself patient so he can make friends and find a girlfriend.


Notes about the environment:
- Bedroom (2nd)
- cushion to sit on
- carpeted floor
- altar: buddha statue, picture, candle
- Posters on the wall: Thangka, japanese painting
- bookshelf with books
- window with light coming in
General Notes:
It has been quite enjoyable coming up with the fictional life of Phil Bulbman. Andrew and I have had a lot of fun. We seem to work well as a team, both bringing ideas to the table and hashing them out without drama. He seems keen on the project, which is good as we have quite a bit of work ahead. We need to clarify our specific roles as we go ahead with the project.
I have been using a free program called celtx, available on the net. It helps do pre-production. It has been handy for organizing our ideas and collaborating over the web.
We need to get our storyboard sorted soon and loaded into celtx as it is due on the 11th.
We settled on Phil Bulbman (as in Philips bulbs, ha!)
He's a 60W (not real bright) light bulb (still debating whether or not he's clear or soft-white).
Occupation: Lighting
Eyes: Black text - "Philips" and "60W"
Marital Status: Single
Lives: New York City Apartment, 3rd floor, 2BR
Height: 100cm (big bulb!)
Base: Shiny metal (alum)
Age: 35
Personality: Impatient
He's jealous of CCFL (high-efficiency) light bulbs, so he is trying to better himself through meditation. After 15 years in NYC he is losing his brightness and is trying to regain it. He's feeling a little "burned-out" from working so hard to a make a living in NYC. He moved to NYC to find a better life and experience the big city. He was born and raised in Alburnett, IA (pop. 559). Sick of living in a small town with nothing to do so he moved to NYC to experience more things. Trying to make himself patient so he can make friends and find a girlfriend.


Notes about the environment:
- Bedroom (2nd)
- cushion to sit on
- carpeted floor
- altar: buddha statue, picture, candle
- Posters on the wall: Thangka, japanese painting
- bookshelf with books
- window with light coming in

General Notes:
It has been quite enjoyable coming up with the fictional life of Phil Bulbman. Andrew and I have had a lot of fun. We seem to work well as a team, both bringing ideas to the table and hashing them out without drama. He seems keen on the project, which is good as we have quite a bit of work ahead. We need to clarify our specific roles as we go ahead with the project.
I have been using a free program called celtx, available on the net. It helps do pre-production. It has been handy for organizing our ideas and collaborating over the web.
We need to get our storyboard sorted soon and loaded into celtx as it is due on the 11th.
Labels: 3d, animation, Character Dossier, ideas
# posted by Andre : Saturday, September 08, 2007
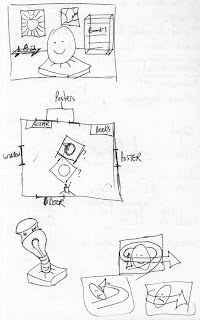
Working out the storyboard. Here are some sketches I did as an experiment before meeting with Andrew:
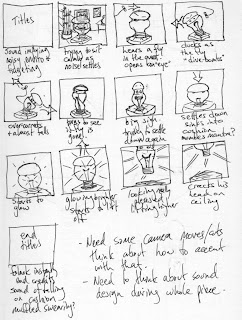
It really helped to do a quick sketch like this to work out how the story should go, and to think about the timing of the action. It also really helped to see how moving the camera could create effects, and affect the action.

It really helped to do a quick sketch like this to work out how the story should go, and to think about the timing of the action. It also really helped to see how moving the camera could create effects, and affect the action.
# posted by Andre : Saturday, September 08, 2007
Thursday, September 6, 2007
Sketching ideas for 3D Animation Project
Some ideas for the 3D Animation project:
Meditator walks into his meditation room.
Sits on a cushion. Tries to meditate.
Disturbed by noises outside, a fly etc...
Finally gets it together. Starts to levitate, and glow and bumps his head on the ceiling.
The End.
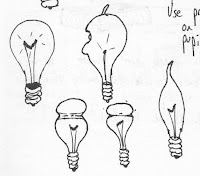
The main character could be a bulb. That might add a humorous element especially with the glowing. The bulb could be clear or frosted glass, depending on how hard it is to make it clear. We could use the filament as the mouth to allow the bulb to show some expression.
Not sure how to do the eyes? Indented? Use printed text on bulb for prints? Maybe one big eye that goes all the way around? The whole thing blinks!?
Reference images:

[This is a light bulb model I found on Turbo Squid.]
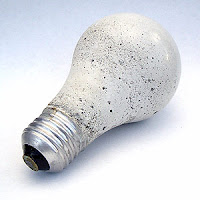
[image courtesy of finkbuilt.com]
This is a great example of a frosted bulb with flaws, which would go well with our flawed meditator. This one is actually made out of concrete, pretty cool idea.
Meditator walks into his meditation room.
Sits on a cushion. Tries to meditate.
Disturbed by noises outside, a fly etc...
Finally gets it together. Starts to levitate, and glow and bumps his head on the ceiling.
The End.
The main character could be a bulb. That might add a humorous element especially with the glowing. The bulb could be clear or frosted glass, depending on how hard it is to make it clear. We could use the filament as the mouth to allow the bulb to show some expression.
Not sure how to do the eyes? Indented? Use printed text on bulb for prints? Maybe one big eye that goes all the way around? The whole thing blinks!?
Reference images:

[This is a light bulb model I found on Turbo Squid.]

[image courtesy of finkbuilt.com]
This is a great example of a frosted bulb with flaws, which would go well with our flawed meditator. This one is actually made out of concrete, pretty cool idea.
# posted by Andre : Thursday, September 06, 2007
3D Animation Project - 15 second animation
Well, we have received our instructions for the second 3D project: create a 15 second animation from scratch including storyboards, character dossier, 2d animatic, 3d animatic, and finally animation.
Labels: 3d, animation, logbook
# posted by Andre : Thursday, September 06, 2007
![]()
Subscribe to Posts [Atom]